Creating, Editing, and Deleting an Account

Accounts represent the various businesses that your organisation interacts with, whether a supplier or customer.

Creating an Account

Accounts can be created via two methods. The first is through the Lead conversion button, where an Account will automatically be created with the relevant lead details. The second method, like many other items is through the table list page and those steps can be found below.

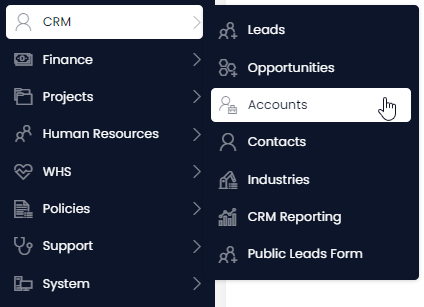
  1. In Explorer select CRM > Accounts

A screenshot that shows how the user can navigate to the "Accounts" page. The user has clicked the "CRM" folder which has an icon of a person, and then the "Accounts" menu button, which has an icon of a person with a briefcase in the corner. The items that have been clicked are white with navy text. Items that have not been selected are the inverse.

  1. Select New Account

A screenshot to show the location and appearance of the "New Account" button. The button is annotated with a red box to highlight the location of the button in the Command Bar. The button has an icon of a person with a briefcase.

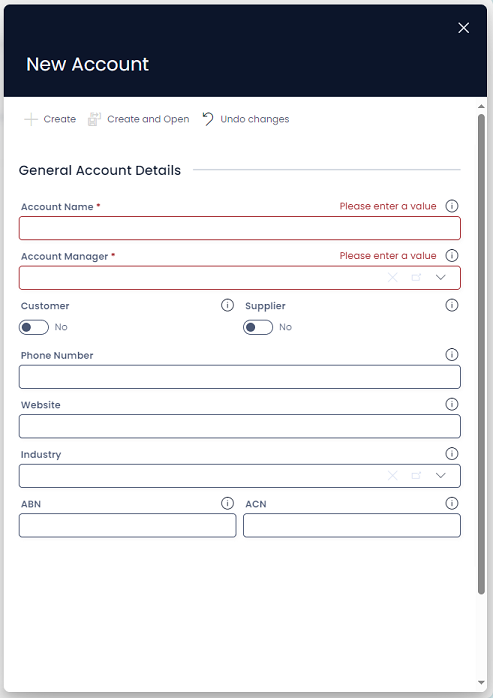
  1. Enter all of the relevant details

A screenshot of the New Account create screen. The screen has a navy header that reads "New Account, with the following fields: Account Name, Account Manager, Customer, Supplier, Phone Number, Website, Industry, ABN, ACN. No sample data is entered into these fields.

  1. Press Create or Create and Open

Editing an Account

  1. Edit any relevant fields on the Account page as needed
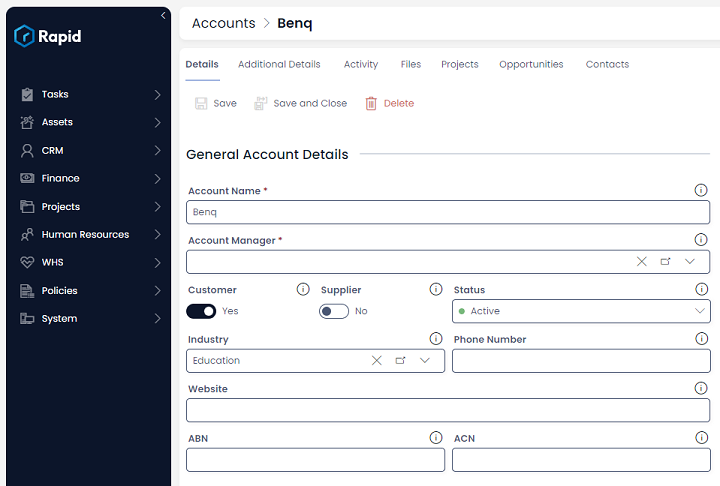
A sample Account item page. This the details that have been entered in tis example are: "Account Name: Benq", "Customer: Yes", "Supplier: No", "Status: Active", "Industry: Education".

  1. Once you have finished editing, click on Save or Save and Close.

A screenshot to demonstrate the location and appearance of the "Save" and "Save and Close" buttons in the Command Bar of an account item page. The screenshot is annotated with a red box that is used to highlight the location of these buttons.

Deleting Accounts

It is not recommended to delete an Account instead change its status to Inactive. This way, you can maintain a list of all your accounts, and reinstate them as Active if they come back as a customer or supplier.

However, if you need to delete an Account due to incorrect data entry or a duplicate entry, you can do so in two ways: from the list or from the item page. Deleting from the list allows you to delete multiple Accounts at once.

Deleting Multiple Accounts

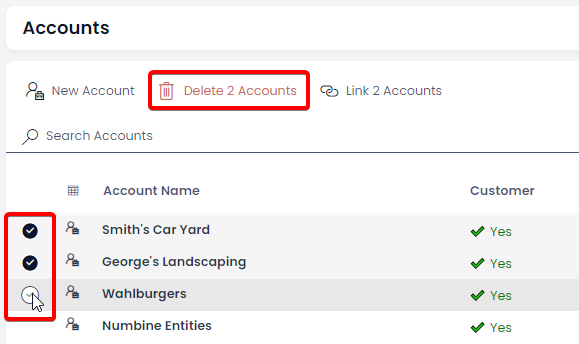
  1. Select the Accounts you wish to delete by ticking the boxes or by clicking and dragging to select multiple items.

  2. Click on the Delete X Accounts button

A screenshot to demonstrate a user selecting multiple items. The screenshot is annotated with two red boxes. The first box highlights the "Delete 2 Accounts" button, which states this because two items have been selected. The second red box highlights that two items have been selected by the user, and a third item is about to be selected.

Deleting a Single Account

  1. Open the Account item you wish to delete. (Locate the Account either by scrolling through the list or using the search bar).

  2. Press Delete

A screenshot of the "Delete" button on an item page. The button has an icon of a red trash can, and a red label that reads "Delete". The screenshot is annotated with a red box that highlights the location of the Delete button in the item page Command Bar.